Are you hearing squeaky sounds or feeling a soft brake pedal when you stop your Honda Accord? It might be time to change your brakes.
Knowing how to change brakes on your Honda Accord can save you money and keep you safe on the road. In this guide, you’ll find simple, step-by-step instructions that anyone can follow—even if you’ve never worked on a car before.
By the end, you’ll have the confidence to handle this important task yourself. Ready to take control of your car’s safety? Let’s get started.

Credit: www.oreillyauto.com
Tools And Materials Needed
Changing the brakes on a Honda Accord requires the right tools and materials for a smooth process. Having everything ready helps avoid delays and mistakes. This section lists what you need to prepare before starting the brake replacement.
Essential Tools
- Jack and jack stands to lift and support the car safely
- Lug wrench to remove the wheel nuts
- Socket set for bolts and screws on brake parts
- C-clamp or brake caliper tool to compress the brake caliper piston
- Flathead screwdriver to pry off brake components
- Brake cleaner spray to clean brake parts
- Torque wrench to tighten bolts to the correct specification
Brake Parts Required
- New brake pads designed for Honda Accord
- Brake rotors if replacement is necessary
- Brake grease to lubricate caliper slides and backing plates
- Brake hardware kit, including clips and pins
Safety Equipment
- Protective gloves to keep hands clean and safe
- Safety glasses to protect eyes from dust and debris
- Work clothes that can get dirty
- Wheel chocks to prevent the car from rolling
Preparing Your Vehicle
Before changing the brakes on your Honda Accord, prepare the vehicle carefully. Proper preparation ensures safety and smooth work. Take time to organize your tools and clear the workspace. A well-prepared vehicle makes the brake change faster and safer.
Parking And Securing
Park the car on a flat, hard surface. Avoid soft or sloped areas to prevent rolling. Engage the parking brake firmly. Place wheel chocks behind the rear wheels to block movement. Turn off the engine and remove the keys. Safety first—never work on a moving vehicle.
Removing The Wheel
Loosen the lug nuts slightly before lifting the car. Use a jack to raise the vehicle at the correct jacking points. Secure the car with jack stands for stability. Remove the lug nuts completely and take off the wheel. Store the wheel safely to avoid damage.
Inspecting Brake Components
Check the brake pads for thickness and wear signs. Look at the brake rotor surface for grooves or rust. Examine brake lines for cracks or leaks. Inspect the caliper for damage or stuck parts. Note any parts needing replacement before starting brake work.
Removing Old Brakes
Changing brakes on your Honda Accord can seem daunting. But removing the old brakes is a straightforward task. This section provides step-by-step guidance. With patience and the right tools, you can do it.
Detaching The Caliper
Start by loosening the lug nuts on the wheel. Lift the vehicle using a jack and secure it with stands. Remove the wheel to access the brake assembly. Locate the caliper, which holds the brake pads. Use a socket wrench to remove the bolts holding the caliper. Gently lift the caliper off the rotor. Support it with a piece of wire or a bungee cord. Avoid letting it hang by the brake line.
Taking Out Brake Pads
With the caliper removed, the brake pads are visible. Slide the old brake pads out of their slots. Inspect the pads for wear and damage. This helps you understand the condition of your brakes. Be cautious of any clips or springs that may be present. Keep them safe as you may need them for the new pads.
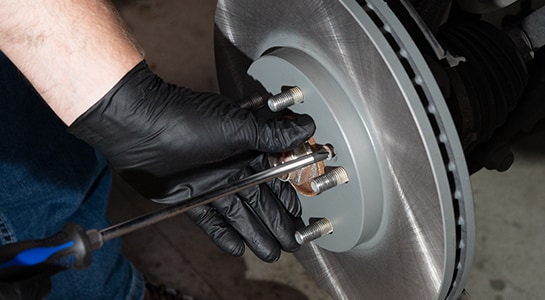
Removing The Rotor
To remove the rotor, locate the screws holding it in place. Use a screwdriver to take out these screws. If the rotor is stuck, tap it gently with a rubber mallet. This can help loosen any rust or debris. Once free, slide the rotor off the wheel hub. Inspect the hub for dirt or rust. Clean it before placing a new rotor. This ensures a smooth and secure fit.
Credit: www.oreillyauto.com
Installing New Brakes
Installing new brakes on your Honda Accord is a crucial part of ensuring your vehicle’s safety and performance. This process demands attention to detail and patience, but it’s rewarding when you feel the difference in braking power afterward. Let’s break down the key steps to get your new brakes in place correctly.
Placing The New Rotor
Start by carefully positioning the new rotor onto the wheel hub. Make sure it sits flush against the hub surface to avoid any wobbling or vibrations later.
Sometimes, slight rust or debris can prevent the rotor from fitting perfectly. Clean the hub with a wire brush if needed. Have you ever noticed uneven brake wear caused by a rotor that wasn’t seated properly?
Fitting New Brake Pads
Next, place the new brake pads into the caliper bracket. Ensure the friction surface faces the rotor and that the pads slide in smoothly without forcing them.
Check if your brake pads come with any anti-squeal shims or grease—these help reduce noise and improve pad life. Have you considered the benefits of using high-quality brake pads over generic replacements?
Reattaching The Caliper
Finally, compress the caliper piston using a suitable tool before positioning the caliper over the new pads and rotor. This step is essential to provide enough space for the new, thicker pads.
Secure the caliper bolts tightly, but avoid overtightening, which can damage the threads. Remember, your brake system’s reliability depends on how well you reattach the caliper—have you double-checked your torque specs?
Finishing Steps
After installing the new brake pads and assembling the brake components, some final steps remain. These finishing steps ensure your Honda Accord’s brakes function safely and smoothly. Take your time and follow each step carefully to complete the job.
Reinstalling The Wheel
Place the wheel back onto the hub. Align the holes with the lug bolts. Hand-tighten the lug nuts to hold the wheel in place. Avoid using the wrench at this point to prevent misalignment.
Once all lug nuts are hand-tightened, use a wrench or socket to snug them in a star pattern. This pattern helps the wheel seat evenly on the hub. Do not fully tighten yet. Wait until the vehicle is lowered.
Lowering The Vehicle
Slowly lower your Honda Accord using the jack. Keep control to avoid sudden drops. Remove the jack once the vehicle rests securely on the ground. This prevents any accidents while tightening the lug nuts.
Testing Brake Performance
Before driving, press the brake pedal several times. This action seats the brake pads against the rotors. The pedal should feel firm and responsive.
Test the brakes at low speed in a safe area. Listen for unusual noises and check for smooth braking. If the brake feels soft or strange, recheck the installation and brake fluid level.
Troubleshooting Tips
Troubleshooting brake issues on a Honda Accord can save time and ensure safety. Knowing common problems helps fix them quickly. Some brake troubles show clear signs. Others need careful checking to spot.
Simple fixes often solve most brake troubles. Still, some problems need expert care. Recognizing when to get professional help keeps your car safe on the road.
Common Issues And Fixes
- Squeaking or Squealing Noises:Usually caused by worn brake pads. Replace pads to stop noise.
- Brake Pedal Feels Soft:Might mean air in brake lines. Bleed brakes to remove air.
- Car Pulls to One Side:Could be uneven brake pad wear or stuck caliper. Check and replace parts as needed.
- Brake Warning Light On:Indicates low brake fluid or sensor issue. Check fluid level and sensors.
- Vibration While Braking:Often caused by warped rotors. Resurface or replace rotors.
When To Seek Professional Help
- Brake fluid leaks under the car. This needs urgent repair.
- Brake pedal sinks to the floor without resistance.
- Unusual noises continue after pad replacement.
- Brakes feel ineffective or unresponsive.
- Warning lights stay on after checks.

Credit: www.youtube.com
Frequently Asked Questions
How Often Should I Change Brakes On A Honda Accord?
Brake pads on a Honda Accord should be replaced every 30,000 to 70,000 miles. This depends on driving habits, road conditions, and brake quality. Regular inspections help detect wear early, ensuring safety and optimal braking performance.
What Tools Are Needed To Change Honda Accord Brakes?
You need a jack, lug wrench, C-clamp, socket set, and brake cleaner. Also, have new brake pads and possibly new rotors. These tools ensure a smooth, safe brake replacement process on your Honda Accord.
How Long Does It Take To Change Brakes On A Honda Accord?
Changing brakes typically takes 1 to 2 hours for both front or rear wheels. Experience level and tools available can affect the time. Proper steps and safety precautions are essential for a successful brake change.
Can I Change Honda Accord Brakes Myself Safely?
Yes, with proper tools, instructions, and safety measures, you can change brakes yourself. Ensure the car is securely lifted and follow step-by-step guides. If unsure, consult a professional mechanic to avoid risks.
Conclusion
Changing brakes on a Honda Accord is doable with patience and care. Follow each step slowly and carefully for safety. Check all parts before finishing to ensure they fit right. Keep tools handy and work in a clean space. Regular brake checks help your car stop safely every time.
This guide helps you save time and money. Feel confident knowing you did the job yourself. Brake care keeps you and others safe on the road. Simple steps, clear instructions, and a bit of effort make a big difference.