If you want to keep your car battery healthy and ready to go, using a trickle charger is one of the best ways to do it. But how exactly do you connect a trickle charger to your car battery safely and correctly?
Getting it wrong can damage your battery or even cause safety risks. You’ll discover simple, step-by-step instructions that anyone can follow. By the end, you’ll feel confident hooking up your trickle charger like a pro—saving you money and stress in the long run.
Keep reading to learn how to protect your car’s power source with ease.
Credit: www.slashgear.com
Choosing The Right Trickle Charger
Choosing the right trickle charger is crucial for keeping your car battery healthy and ready to go. Not all chargers are built the same, and picking the wrong one can lead to undercharging or even damage. Understanding the types, features, and safety certifications will help you make a smart choice tailored to your car's needs.
Types Of Trickle Chargers
There are several types of trickle chargers available, each designed for different uses:
- Basic Trickle Chargers:These provide a steady, low current to keep your battery topped off. They're simple but lack smart features.
- Smart Trickle Chargers:These detect battery status and adjust charging automatically. They prevent overcharging and are ideal for regular use.
- Solar Trickle Chargers:Powered by sunlight, these chargers are great for remote locations but may charge slower.
Choosing the right type depends on how often you use your vehicle and where you plan to charge it.
Key Features To Consider
Look for chargers with features that match your lifestyle and battery type:
- Automatic Shut-off:Prevents overcharging by stopping the charge once the battery is full.
- Compatibility:Make sure the charger suits your battery’s voltage (6V, 12V, or 24V) and type (lead-acid, AGM, gel, etc.).
- Weather Resistance:If you’ll be charging outdoors, a water-resistant design is essential.
- Indicator Lights or Displays:These help you monitor the charging progress easily.
Have you ever left a charger connected and worried if it was harming the battery? Features like automatic shut-off can put those worries to rest.
Safety Certifications
Safety certifications ensure the charger meets industry standards and reduces risk:
- UL (Underwriters Laboratories):Indicates the charger has passed rigorous safety tests.
- CE Marking:Shows compliance with European safety, health, and environmental protection requirements.
- FCC Certification:Ensures the device won’t interfere with other electronic equipment.
Ignoring safety certifications can lead to dangerous situations. Would you trust a charger without these approvals to protect your vehicle and yourself?
Credit: www.ecoflow.com
Preparing Your Car And Charger
Preparing your car and charger properly sets the stage for a smooth and safe connection of your trickle charger to the car battery. Skipping this step can lead to ineffective charging or even damage. Taking a moment to get familiar with your battery’s location, check its condition, and gather the right tools makes the entire process less frustrating and more efficient.
Locating The Car Battery
Car batteries are usually easy to find, but not all are located under the hood. Some vehicles place the battery in the trunk or under a seat. Have you checked your owner's manual? It’s the quickest way to pinpoint the exact spot.
Once you find the battery, look for the positive (+) and negative (-) terminals. These are crucial for connecting your charger correctly. Misidentifying them can cause serious issues.
Inspecting Battery Condition
Before hooking up the charger, examine your battery for any obvious damage. Check for cracks, leaks, or corrosion around the terminals. Corrosion often looks like a white or green powdery substance and can block a good connection.
If you spot corrosion, clean it carefully using a mix of baking soda and water with a brush. But if the battery is cracked or leaking, charging could be dangerous. Would you risk your safety by ignoring visible damage?
Gathering Necessary Tools
Having the right tools on hand speeds up the process and keeps you safe. At minimum, you’ll need:
- Your trickle charger
- Protective gloves and eye protection
- A wire brush or battery terminal cleaner
- Wrenches to loosen battery terminal clamps if needed
Safety gear is often overlooked but essential. Gloves protect you from acid burns, and eye protection guards against sparks. Are you prepared to handle unexpected situations?
Connecting The Trickle Charger
Connecting a trickle charger to your car battery is a simple process. It helps keep your battery charged over time. Follow these easy steps for a successful connection.
Ensuring Charger Is Unplugged
First, ensure the charger is not plugged into any power source. This step prevents sparks or short circuits. Safety first!
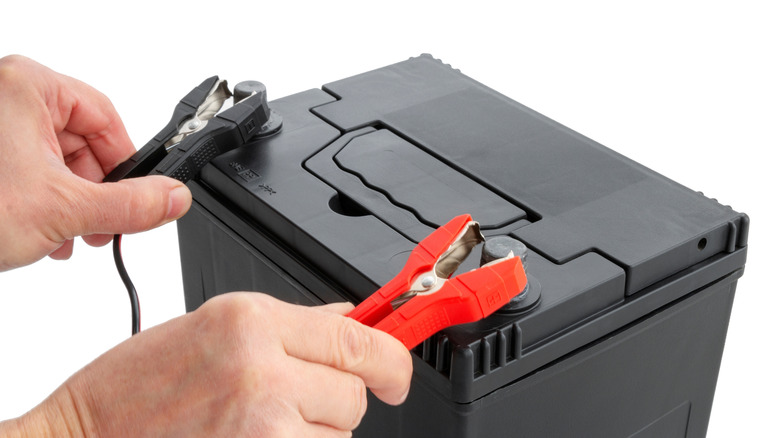
Attaching Positive Clamp
Locate the positive terminal on the car battery. It's usually marked with a plus sign (+). Attach the red clamp to this terminal. Make sure it’s secure and not loose.
Attaching Negative Clamp
Find the negative terminal, marked with a minus sign (-). Connect the black clamp to this terminal. Ensure a tight and firm connection.
Double-checking Connections
Double-check both connections before proceeding. Make sure each clamp is firmly attached to the correct terminal. This prevents any potential issues when you plug in the charger.
Operating The Trickle Charger
Operating a trickle charger correctly is key to maintaining your car battery’s health. It’s not just about plugging it in; you need to ensure the charger is set up to deliver the right amount of power and keep an eye on how the charging progresses. Let’s walk through the crucial steps to make sure your battery gets the gentle boost it needs without any risk.
Plugging In The Charger
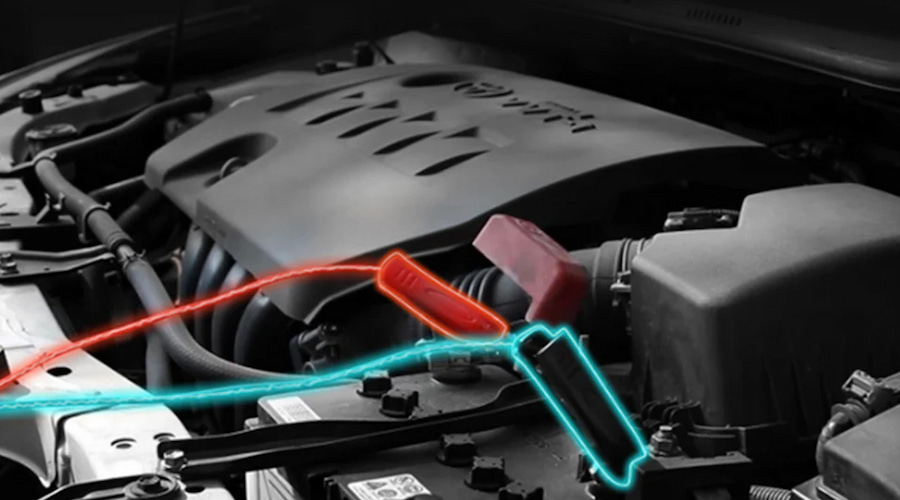
Start by connecting the charger’s positive clamp (usually red) to the positive terminal on your car battery. Then attach the negative clamp (usually black) to the negative terminal or a grounded metal part of the car. Double-check these connections to avoid sparks or damage.
Once the clamps are secure, plug the charger into a power outlet. Make sure the outlet is working properly and the charger’s cord isn’t damaged. This simple step can save you from frustration later on.
Setting Charging Mode
Most trickle chargers offer different modes like “maintenance” or “fast charge.” Select the mode that matches your battery’s condition and your charging needs. For example, if you’re topping off a healthy battery, use the maintenance mode to avoid overcharging.
Some chargers let you choose the battery type—lead-acid or AGM. Picking the right one helps the charger deliver the correct voltage and current. Have you checked your charger’s manual to match these settings?
Monitoring Charging Progress
Keep an eye on the charger’s indicator lights or digital display to track the charging status. These indicators tell you if the battery is charging, fully charged, or if there’s a problem. Ignoring these signs can lead to undercharging or damaging the battery.
It’s a good habit to check the battery voltage occasionally with a multimeter. This gives you a precise reading beyond the charger’s indicators. Have you noticed how a little attention here can extend your battery’s lifespan significantly?
Disconnecting The Charger Safely
Disconnecting the trickle charger safely is very important. It prevents sparks and protects your car battery and charger. Follow the right order to avoid accidents and damage. Take your time and do not rush.
Unplugging The Charger
Start by unplugging the charger from the power outlet. This stops the flow of electricity. It is safer to disconnect the power source first. Do not touch the clamps before unplugging.
Removing Negative Clamp
Next, remove the negative clamp from the car battery. The negative clamp is usually black. Gently pull it off the battery terminal. Avoid touching the positive terminal with the clamp.
Removing Positive Clamp
Then, remove the positive clamp from the battery. The positive clamp is usually red. Carefully lift it off the battery terminal. Keep the clamps from touching each other or metal parts.
Storing The Charger Properly
After removing the clamps, coil the charger cables neatly. Store the charger in a dry, cool place. Keep it away from dust and moisture. Proper storage extends the charger’s life and keeps it ready for use.
Troubleshooting Common Issues
Troubleshooting common issues with a trickle charger helps keep your car battery healthy. Problems may arise during connection or charging. Knowing how to spot and fix these issues saves time and effort.
Charger Not Turning On
Check if the charger is plugged into a working outlet. Examine the power cord for damage or loose connections. Ensure the charger’s switch is turned on. Some chargers have a fuse; verify it is not blown. Try another outlet to rule out power issues.
Battery Not Charging
Confirm the charger clamps are attached correctly to battery terminals: positive to positive, negative to negative. Clean any corrosion from battery posts and clamp contacts. A deeply discharged battery may need a longer charging time. Test the battery voltage with a multimeter to check its condition. Replace the battery if it no longer holds a charge.
Unusual Noises Or Smells
Humming or buzzing sounds may indicate faulty wiring or internal charger issues. A burning smell signals overheating or electrical shorts. Immediately disconnect the charger to prevent damage. Inspect cables for exposed wires or melted insulation. Use the charger in a well-ventilated area to avoid overheating.
Maintaining Your Car Battery
Maintaining your car battery is crucial for ensuring your vehicle starts reliably every time. A well-maintained battery saves you from unexpected breakdowns and costly replacements. Simple habits and timely care can extend your battery's life significantly.
Regular Charging Tips
Keep your battery charged regularly, especially if you don't drive often. A trickle charger is perfect for this since it provides a slow, steady charge that prevents overcharging.
Always connect the charger in the right order: positive terminal first, then negative. This avoids sparks and potential damage.
Check the battery voltage with a multimeter before charging. If it reads below 12.4 volts, it’s time to give it some power.
Avoiding Battery Damage
Never let your battery run completely dead; deep discharges reduce its lifespan. Avoid exposing your battery to extreme heat or freezing temperatures as these conditions accelerate wear.
Keep the battery terminals clean and free from corrosion. A simple mix of baking soda and water can help you clean them safely.
Have you ever noticed your car struggling to start after sitting idle for weeks? That’s a warning sign to maintain your battery better.
When To Replace The Battery
Even with proper care, batteries don’t last forever. If your battery is more than 3-5 years old and shows signs like slow engine cranking or dim headlights, it might be time to replace it.
Perform a load test or visit a mechanic to check battery health if you’re unsure. Don’t wait for a complete failure—that often happens at the worst time.
Remember, a fresh battery ensures peace of mind and smooth starts every day.

Credit: www.reddit.com
Frequently Asked Questions
How Do I Connect A Trickle Charger To A Car Battery?
First, turn off the charger and car. Attach the positive clamp to the battery's positive terminal. Connect the negative clamp to the negative terminal or chassis ground. Plug in the charger and switch it on. Follow the charger’s instructions for proper settings.
Can I Leave A Trickle Charger Connected Overnight?
Yes, trickle chargers are designed for long-term use and can safely stay connected overnight. They maintain battery charge without overcharging. However, always check the manufacturer’s guidelines to avoid potential issues or damage to your battery.
What Safety Precautions Should I Take When Connecting?
Wear protective gloves and glasses. Ensure the charger is off before connecting clamps. Attach the positive clamp first, then the negative. Avoid sparks by not touching clamps together. Work in a well-ventilated area away from flammable materials.
Will A Trickle Charger Damage My Car Battery?
No, a trickle charger delivers low, steady current designed to maintain battery health. It prevents overcharging and extends battery life when used correctly. Always use a charger compatible with your battery type to avoid damage.
Conclusion
Connecting a trickle charger to your car battery is simple and safe. Always attach the positive clamp first, then the negative. Keep the charger settings correct to avoid damage. Check the battery regularly while charging. This method helps maintain battery health and extends its life.
A well-charged battery ensures your car starts smoothly. Follow these steps each time you use a trickle charger. Stay safe and keep your battery ready for the road.