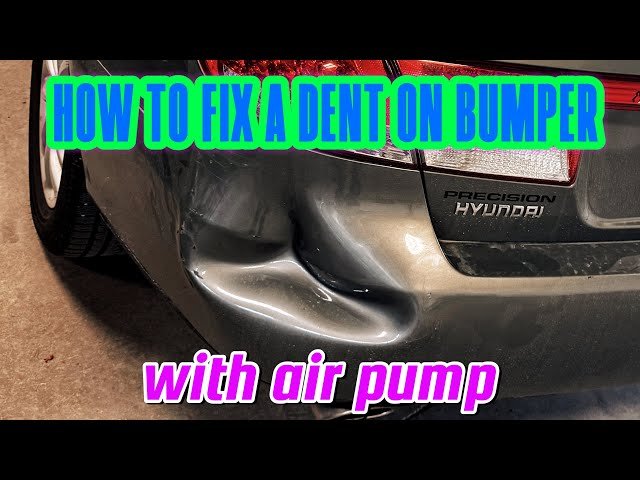
Have you noticed an unsightly dent on your car bumper and wondered how to fix it without spending a fortune? You’re not alone.
A dent can make your car look older and less cared for, but the good news is, you don’t always need a professional to restore it. In this guide, you’ll discover simple, effective ways to repair that dent yourself. By the end, you’ll feel confident tackling the job and bringing your car’s bumper back to its smooth, polished look.
Keep reading—you’re just a few steps away from making your car look great again.

Credit: www.sbkeswick.com
Tools Needed For Repair
Before you start fixing a dent on your car bumper, gathering the right tools can make a huge difference. Having everything ready prevents interruptions and helps you work more efficiently. Let’s take a look at the essential tools you’ll need to get the job done smoothly.
Basic Tools
These are the simple items you probably already have at home or can easily get from a local store. They form the foundation of any dent repair work and are crucial for small to medium dents.
- Hair Dryer or Heat Gun:Useful for warming the plastic bumper, making it more flexible and easier to reshape.
- Plunger:A common household item that can help pull out minor dents without damaging the paint.
- Soft Cloths:For cleaning and protecting the surface during the repair process.
- Spray Bottle with Water:Keeps surfaces wet when using heat, preventing overheating and paint damage.
- Rubber Gloves:Protect your hands during the repair, especially when working with heat or chemicals.
Have you ever tried to fix a dent without warming the bumper first? It often leads to cracking or peeling paint. Heating the area just enough to soften it is a simple trick that saves a lot of frustration.
Specialized Equipment
For more stubborn dents or professional-level repairs, specialized tools become necessary. These tools are designed to give you better control and more precise results.
- Dent Removal Kit:These kits typically include glue guns, pulling tabs, and a slide hammer to pull out dents without scratching the surface.
- Body Filler and Spreaders:Used to smooth out any imperfections after pulling the dent, ensuring a flat finish.
- Sandpaper (various grits):Essential for preparing the bumper surface before and after applying filler or paint.
- Touch-Up Paint:Matches your car’s color to cover any scratches or damage caused during the repair.
- Heat Gun with Temperature Control:Offers precise heating to avoid overheating and damaging the plastic.
Have you noticed how pulling a dent with the wrong tools can leave marks or cause paint damage? Investing in a quality dent removal kit can prevent these issues and save you time and money in the long run.

Credit: www.youtube.com
Assessing The Dent
Before you jump into fixing a dent on your car bumper, take a moment to carefully assess the damage. Understanding the nature of the dent helps you decide the best repair method and tools to use. Skipping this step could lead to ineffective repairs or even worsen the problem.
Size And Depth
Look closely at how big and deep the dent is. Is it a small, shallow dent, or does it cover a large area with a sharp crease? Small dents can often be fixed with simple tools like a plunger or a hairdryer and compressed air.
Deeper dents might require more advanced techniques or professional help. Have you noticed if the paint is cracked or chipped? That detail is crucial because it affects whether you need to repaint after the repair.
Material Type
Knowing the bumper's material type changes your approach. Is your bumper made of plastic, fiberglass, or metal? Plastic bumpers, common in many cars, respond well to heat-based repairs that reshape the material.
Metal bumpers usually need dent pulling or hammering techniques, while fiberglass requires special fillers and sanding. Do you know what your bumper is made of? Checking your car manual or a quick online search can save you time and effort.
Preparing The Bumper
Clean the bumper thoroughly to remove dirt and grease. Dry it well before starting any repair work. This ensures better adhesion and a smoother finish.
Preparing the bumper is a critical step in fixing a dent on your car's bumper. Getting the surface ready ensures a smoother repair process and a more polished result. This preparation phase can make a significant difference in the outcome, so don't rush it.
Cleaning The Surface
Begin by thoroughly cleaning the bumper. Use a mild detergent mixed with water and a soft cloth to remove dirt and grime. This step ensures that no residue interferes with the repair materials. Dry the area completely with a microfiber towel. A clean, dry surface is essential for the next steps. Have you noticed how a seemingly minor detail, like lingering moisture, can lead to bigger problems later on?
Removing Paint Or Debris
Inspect the bumper for any loose paint or debris. Use a plastic scraper to gently remove any flaking paint. If there are stubborn particles, sand the area lightly with fine-grit sandpaper. This not only removes debris but also helps the repair materials adhere better. In my experience, taking the time to remove all loose materials can prevent future peeling or lifting. Are you willing to invest a little extra effort now to save yourself from future headaches?
Diy Dent Repair Methods
Fixing a dent on your car bumper doesn’t always require a trip to the mechanic. You can try some simple DIY dent repair methods that save time and money. These techniques use household items and a little patience to help restore your bumper’s shape.
Using Hot Water And Plunger
This method works best for plastic bumpers. Pour hot water over the dent to soften the plastic, making it easier to manipulate. Then, press a plunger firmly against the dent and pull it out.
The hot water heats the plastic, so it becomes flexible. The plunger creates suction that can pop the dent back into place. Have you ever tried this on a small dent? It can be surprisingly effective with minimal effort.
Hair Dryer And Compressed Air Technique
Start by heating the dent with a hair dryer for about 30 seconds. Make sure the surface is hot to the touch but not burning. Immediately after, spray compressed air upside down on the dent.
The sudden temperature change causes the plastic to contract quickly, which can make the dent pop out. This technique requires caution—don’t overheat the area or spray too much compressed air to avoid damage. Would you guess that temperature shifts can fix dents so simply?
Applying Heat Gun And Gloves
Using a heat gun provides more controlled heat than a hair dryer. Heat the dented area evenly while wearing heat-resistant gloves to protect your hands. Once the plastic becomes pliable, try pushing the dent out from behind if accessible.
If you can’t reach behind the bumper, gently pull the dent outward with a plunger or suction cup. This method demands careful handling to avoid melting the plastic. Have you noticed how precise heat application can improve results?
Filling And Sanding
Filling and sanding are key steps to fix a dent on a car bumper. These steps restore the smooth surface and prepare the area for painting. Filling covers the dent, while sanding smooths the surface for a seamless look. Proper technique ensures the repair lasts and looks professional.
Choosing The Right Filler
Select a filler designed for plastic bumpers. Most fillers come as two-part kits with resin and hardener. The right filler bonds well with the bumper material and dries quickly. Avoid fillers meant only for metal. Check product labels for plastic compatibility.
Mix the filler and hardener in a clean container. Stir until the color is even. Apply a small amount on the dent using a spreader. Press the filler firmly to fill all dents and cracks. Let it dry fully before sanding.
Sanding For Smooth Finish
Start sanding with coarse-grit sandpaper, around 80 to 120 grit. Sand the filler to shape it close to the bumper’s original curve. Use gentle, circular motions. Avoid sanding too hard; this can damage the bumper.
Next, use finer sandpaper, 220 to 400 grit. This smooths the surface and removes scratches from the coarse sanding. Wipe the area with a clean cloth to remove dust. Check the surface by touch; it should feel smooth and even.
Repeat sanding if needed until the filled area blends with the bumper. Proper sanding ensures a flawless finish after painting.
Painting And Finishing
After you’ve smoothed out the dent on your car bumper, the next important phase is painting and finishing. This step restores your bumper’s appearance, making the repair nearly invisible. It’s a process that requires patience and attention to detail, but the results can be very rewarding.
Priming The Area
Priming creates a smooth, even base for the paint to stick to. Without it, the paint might peel or look patchy over time. Use a spray primer designed for automotive surfaces, and apply several light coats rather than one heavy coat.
Allow each coat to dry completely before applying the next. Sand the primer lightly with fine-grit sandpaper to remove any bumps or imperfections. Have you ever noticed how a well-primed surface makes the paint job look flawless? That’s the power of good preparation.
Matching Paint Colors
Matching the exact color of your car is crucial. Even a slight difference in shade will stand out under sunlight. Check your vehicle’s paint code—usually found inside the driver’s door or under the hood—and buy paint that matches it perfectly.
If you’re unsure, many auto parts stores offer color matching services using your paint code or a sample. Test the paint on a small hidden area first to see how it dries. Getting this right saves you from repainting the whole bumper later, which can be frustrating and costly.
Applying Clear Coat
Clear coat protects your paint and gives it a shiny, polished look. Apply it in thin, even layers, just like the primer and paint. Too much clear coat can cause runs or bubbles, which will ruin your finish.
Let each layer dry fully before adding the next, usually 10 to 15 minutes. After the final coat, allow the bumper to cure for at least 24 hours before touching or washing it. Have you ever seen a car with a dull or peeling finish? That’s often because the clear coat was skipped or applied poorly.
Preventive Tips
Preventing dents on your car bumper saves time and repair costs. Simple habits protect your vehicle’s appearance. Small actions reduce risks and keep your bumper smooth and intact.
Parking Strategies
Choose parking spots away from busy areas. Park at the end of rows to avoid car doors hitting your bumper. Avoid tight spaces with limited room for maneuvering. Use backing-in parking to see obstacles clearly. Always check surroundings before parking or leaving a spot.
Regular Maintenance
Clean your bumper often to spot minor damage early. Use mild soap and water to avoid paint damage. Inspect the bumper for cracks or loose parts regularly. Repair small scratches quickly to prevent rust. Keep your car waxed to add a protective layer against minor impacts.

Credit: www.youtube.com
Frequently Asked Questions
How Can I Fix A Small Dent On A Car Bumper?
You can fix small dents using a plunger or hot water method. Heat the dented area, then push it out gently. This DIY approach works best on plastic bumpers and requires minimal tools.
What Tools Do I Need To Repair A Bumper Dent?
Basic tools include a plunger, hairdryer or heat gun, and a soft cloth. For deeper dents, use a dent repair kit with glue and pulling tabs. Safety gloves and sandpaper help with finishing touches.
Can I Fix A Dent Without Repainting The Bumper?
Yes, minor dents can often be repaired without repainting if the paint isn't cracked. Techniques like heat and pressure can restore the shape. However, if paint damage exists, repainting may be necessary for a perfect finish.
How Long Does It Take To Fix A Bumper Dent At Home?
Fixing a small dent at home usually takes 30 minutes to an hour. Larger or more complex dents can require several hours, especially if sanding and filling are involved. Patience ensures better results.
Conclusion
Fixing a dent on your car bumper can save money and time. Small dents often need simple tools and patience. Start with the right method and work carefully. Avoid rushing to prevent more damage. Regular care helps keep your car looking good.
Try fixing small dents yourself before visiting a shop. Remember, practice makes perfect. Taking action soon keeps your car in better shape. Your bumper will look smooth and neat again. Easy steps bring great results.