Is your car hood looking worn out with peeling paint? It’s frustrating to see your vehicle lose its shine and style because of this common problem.
But don’t worry—fixing peeling paint on your car hood is easier than you might think. In this guide, you’ll discover simple, step-by-step methods to restore your car’s appearance and protect it from further damage. Keep reading, and you’ll soon have a smooth, fresh-looking hood that turns heads wherever you go.
Identify Paint Peeling Causes
Identifying the causes of paint peeling on your car hood is the first step to fixing it properly. Understanding why the paint is peeling helps you choose the right repair method. It also prevents the problem from coming back after repair.
Common Reasons For Peeling
- Poor surface preparation before painting
- Exposure to harsh weather conditions
- Using low-quality paint products
- Damage from chemicals or bird droppings
- Physical damage like scratches and dents
- Improper application or curing of paint
Each cause affects the paint differently. Some cause bubbling, while others lead to large flakes falling off.
Assessing Damage Severity
Check how much paint has peeled off and the size of affected areas. Small spots may need simple touch-ups. Large patches often require sanding and repainting.
Look for rust under the peeling paint. Rust means the metal is exposed and damaged. Rust treatment may be necessary before repainting.
Assess if the peeling is only on the hood or spread to other parts. Widespread peeling may indicate a bigger problem with the car’s paint system.
Gather Necessary Tools
Fixing peeling paint on your car hood starts with the right tools. Gathering necessary tools makes the process smooth and effective. Without proper supplies, the job becomes harder and may not last. Prepare everything before you begin to save time and effort.
Essential Supplies
- Sandpaper (various grits, from coarse to fine)
- Primer suitable for automotive use
- Automotive paint matching your car’s color
- Clear coat for a glossy finish and protection
- Clean cloths and tack cloths to wipe surfaces
- Masking tape and plastic sheets to protect surrounding areas
- Paint sprayer or spray cans for even application
- Automotive body filler to repair any dents or deep scratches
Safety Equipment
- Protective gloves to keep your hands clean and safe
- Safety goggles to protect eyes from dust and paint
- Respirator mask to avoid inhaling harmful fumes
- Long-sleeve clothing to protect skin from chemicals
- Well-ventilated workspace or outdoor area for painting
Prepare The Car Hood
Getting your car hood ready before fixing peeling paint is crucial. Proper preparation ensures the new paint sticks well and lasts longer. Skipping this part might lead to frustration and wasted effort.
Clean The Surface
Start by washing the car hood thoroughly with soap and water. Dirt, grease, and grime can stop paint from adhering properly. Use a microfiber cloth to avoid scratches and rinse with clean water.
After washing, dry the surface completely. Any moisture left behind can cause paint problems later. Have you ever painted over dust and ended up with bumps? Avoid that by cleaning carefully.
Remove Loose Paint
Next, inspect the hood for peeling or flaking paint. Use a plastic scraper or sandpaper to gently remove all loose paint pieces. Be thorough—if you leave any loose paint, the new layer won’t hold well.
Sand the edges around peeled areas to create a smooth transition between bare metal and old paint. This step helps the new paint blend seamlessly. It might take some effort, but your future self will thank you for it.

Credit: www.reddit.com
Sand The Affected Area
Sand the affected area to remove loose paint and create a smooth surface. This helps new paint adhere better. Use fine-grit sandpaper and sand gently to avoid scratching the car hood.
Peeling paint on your car hood can be an eyesore, but the solution is often simpler than you might think. Sanding the affected area is a crucial step in restoring your car's appearance. It prepares the surface for a fresh coat of paint and ensures a smooth finish. Let's dive into how you can effectively sand the peeling paint to pave the way for a flawless repair.
Choosing The Right Sandpaper
Selecting the correct sandpaper is vital for achieving the desired results. Start with a coarse grit sandpaper, such as 120-grit, to strip away the peeling paint efficiently. As you progress, switch to a finer grit, like 320-grit, to smooth out the surface. Ensure the sandpaper is suitable for automotive use, as it is designed to handle the unique surfaces of car exteriors. Using the wrong type could lead to uneven results and potentially more damage.
Sanding Techniques
Begin by sanding the affected area gently, applying even pressure. Circular motions help in covering the surface uniformly, preventing any missed spots. Keep a steady hand and avoid pressing too hard, which could lead to gouges in the surface. Remember to periodically check your progress, wiping away dust to see the results clearly. If you're unsure about your technique, practice on a less visible part of your car. This way, you can hone your skills without worrying about mistakes. Have you ever noticed how small details make a big difference? That's exactly what effective sanding does for your car repair.
Apply Primer
Applying primer is a key step to fix peeling paint on your car hood. Primer helps the new paint stick well and protects the metal surface. It creates a smooth base and stops rust from forming. This step ensures your paint job lasts longer and looks better.
Selecting Primer Type
Choose a primer that matches your car’s paint and metal type. Common options include:
- Epoxy primer – great for metal and rust prevention
- Urethane primer – offers good adhesion and durability
- Etching primer – ideal for bare metal surfaces
Use a primer designed for automotive use to get the best results. Check the label to ensure compatibility with your topcoat paint.
Primer Application Tips
Apply primer in a clean, dust-free area. Follow these tips for a smooth finish:
- Shake the primer can or stir well before use
- Spray or brush in thin, even layers
- Allow each coat to dry before applying the next
- Sand lightly between coats for a smooth surface
- Wear protective gear like gloves and a mask
Proper primer application prevents paint peeling and improves adhesion. Take your time for the best outcome.
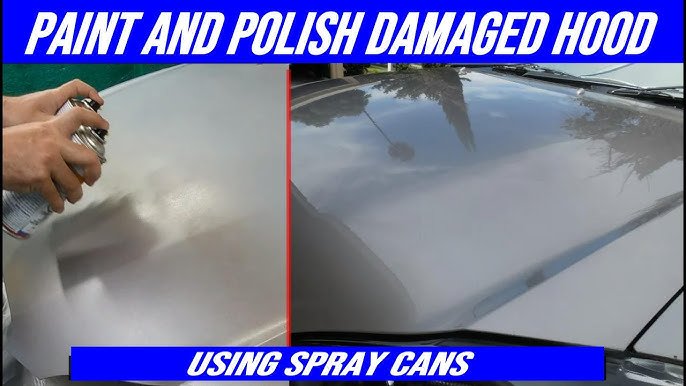
Paint The Hood
Painting the hood is a crucial step to restore your car’s appearance after peeling paint. It’s not just about slapping on a new coat; it’s about carefully matching the color and applying the paint evenly for a professional finish. You want your car hood to look like new, blending seamlessly with the rest of your vehicle.
Matching Paint Color
Finding the exact color match can be tricky, but it’s essential for a flawless repair. Start by locating your car’s paint code, usually found inside the driver’s door or under the hood. This code ensures you get the correct shade, whether it’s metallic, pearl, or solid.
Don’t rely solely on store samples or online pictures. Instead, take a small chip of your paint to an automotive paint supplier. They can mix the exact color using advanced tools, which saves you from a mismatched hood that stands out like a sore thumb.
Spray Painting Steps
Before you start spraying, make sure the hood is clean and sanded smooth. Use fine-grit sandpaper to remove any rough spots and create a surface the paint can stick to. Wipe the hood with a tack cloth to remove dust and debris.
- Apply a primer coat evenly and let it dry completely. Primer helps the paint adhere better and prevents rust.
- Shake your spray paint can thoroughly for at least a minute to mix the paint inside well.
- Hold the can about 6-8 inches from the surface and spray in smooth, even strokes. Avoid heavy coats that can drip.
- Let each layer dry for about 10-15 minutes before applying the next. Usually, 2-3 coats are enough for good coverage.
- Finish with a clear coat for extra shine and protection. This step helps your paint last longer against weather and wear.
Have you considered the difference a well-applied paint job can make to your car’s value and curb appeal? Taking your time with these steps can save you from frustration and redoing the job later. Remember, patience and attention to detail pay off when painting your car hood.
Finish With Clear Coat
Applying a clear coat is the final step in fixing peeling paint on your car hood. It protects the new paint and gives a smooth, shiny finish. Without a clear coat, the paint can fade or peel again quickly. Taking time to apply it properly will make your repair last longer and look better.
Purpose Of Clear Coat
The clear coat acts as a shield for your paint. It protects against sunlight, rain, and dirt. This layer prevents fading and chipping. It also adds depth and shine to the color beneath. Clear coat keeps your car hood looking fresh and new for years.
Applying Clear Coat Properly
Prepare the surface by cleaning and sanding lightly. Use a spray can or spray gun for even coverage. Hold the spray about 6 to 8 inches from the surface. Apply thin, even layers to avoid runs and drips.
- Spray in smooth, steady strokes.
- Allow each layer to dry before applying the next.
- Apply 2 to 3 coats for best protection.
- Let the clear coat cure fully, usually 24 hours.
Work in a dust-free area and avoid windy conditions. This helps prevent particles from sticking to the clear coat. Proper application ensures a smooth, durable finish that protects your repair well.
Allow Proper Drying Time
Allowing proper drying time is crucial when fixing peeling paint on your car hood. Skipping or rushing this step can cause the paint to peel again or look uneven. Taking the time to let your paint dry fully ensures a smooth, long-lasting finish that protects your car and keeps it looking great.
Drying Environment
The environment where your car hood dries plays a huge role in how well the paint sets. Choose a clean, dust-free space with good airflow but avoid direct sunlight or windy areas. High humidity or extreme temperatures can slow down drying or cause bubbles and cracks.
I once painted my car hood in a garage with poor ventilation. The paint dried sticky and uneven, forcing me to redo the work. Learn from my experience: pick a shaded, well-ventilated spot to get the best results.
Curing Duration
Curing is more than just the paint feeling dry to touch—it’s the chemical process that strengthens the paint layer. Depending on the paint type, curing can take anywhere from 24 hours to several days.
Check the paint manufacturer's instructions for specific drying times, and don’t rush into handling or driving your car too soon. Giving your paint enough time to cure fully helps avoid peeling and improves durability.
- Wait at least 24 hours before touching the surface.
- Avoid washing or exposing the hood to harsh conditions for at least a week.
- Consider applying a clear coat after proper curing for extra protection.
What drying environment do you have available? Adjusting your plan based on your space can save you time and frustration.
Maintain Flawless Finish
Maintaining a flawless finish on your car hood keeps it looking new and protects the paint. Careful upkeep stops peeling and extends the life of the paint job. Simple habits make a big difference in preserving your car’s shine. Follow these tips to keep your car hood smooth and bright.
Regular Cleaning Tips
Clean your car hood often to remove dirt and grime. Use a soft sponge or microfiber cloth to avoid scratches. Choose a mild car wash soap instead of household cleaners. Rinse thoroughly with water to remove all soap. Dry the surface gently with a clean towel to prevent water spots. Avoid washing under direct sunlight to reduce streaks.
Preventing Future Peeling
Protect the paint by applying a good quality wax every few months. Wax forms a barrier against UV rays and moisture. Park your car in shaded areas or a garage to avoid sun damage. Fix small chips and scratches quickly to stop peeling from spreading. Use paint protection films or car covers for extra defense. Regular inspections catch problems early, saving costly repairs.

Credit: www.youtube.com

Credit: www.youtube.com
Frequently Asked Questions
How Do I Stop Paint From Peeling On My Car Hood?
To stop paint peeling, clean and dry the hood thoroughly. Apply a primer and use quality paint. Seal with a clear coat. Regular waxing protects the surface. Address scratches and chips immediately to prevent further damage.
What Causes Car Paint To Peel On The Hood?
Car paint peels due to sun exposure, moisture, and poor paint application. Harsh chemicals and road debris can also damage the paint. Aging and lack of maintenance weaken the protective layers, causing peeling.
Can I Fix Peeling Paint On My Car Hood Myself?
Yes, you can fix peeling paint by sanding, priming, and repainting the affected area. Use matching paint and clear coat for protection. Follow safety guidelines and work in a well-ventilated space for best results.
How Long Does It Take To Fix Peeling Paint On A Car Hood?
Fixing peeling paint usually takes a few hours to a day. Drying times for primer, paint, and clear coat vary. Proper curing ensures a durable finish. Avoid driving or washing the car during this period.
Conclusion
Fixing peeling paint on your car hood protects it from rust. Start with cleaning and sanding the damaged area well. Use quality primer and paint for long-lasting results. Take your time to apply thin, even coats. Proper care helps your car look good and stay strong.
Small repairs now save big costs later. Keep your car’s hood smooth and shiny by acting quickly. Simple steps make a big difference in the end. Your effort shows in your car’s fresh, clean look.