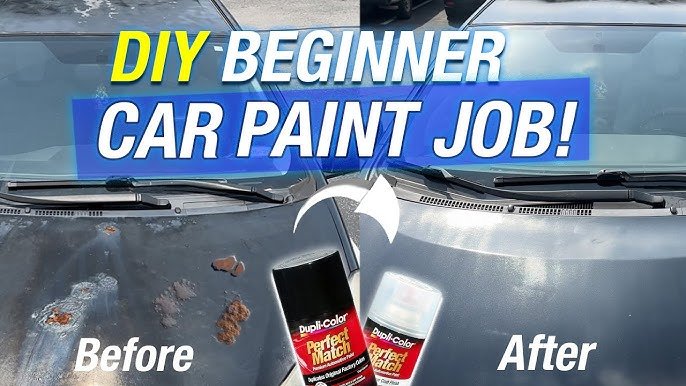
Want to give your car a fresh, new look without spending a fortune? Painting your car hood with spray paint is easier than you think.
Whether you’re fixing scratches or just changing the color, this guide will walk you through each simple step. By the end, you’ll have the confidence to transform your car hood yourself, saving time and money. Ready to learn how to get a smooth, professional finish?
Keep reading—you’re about to discover the secrets to painting like a pro.
Choosing The Right Spray Paint
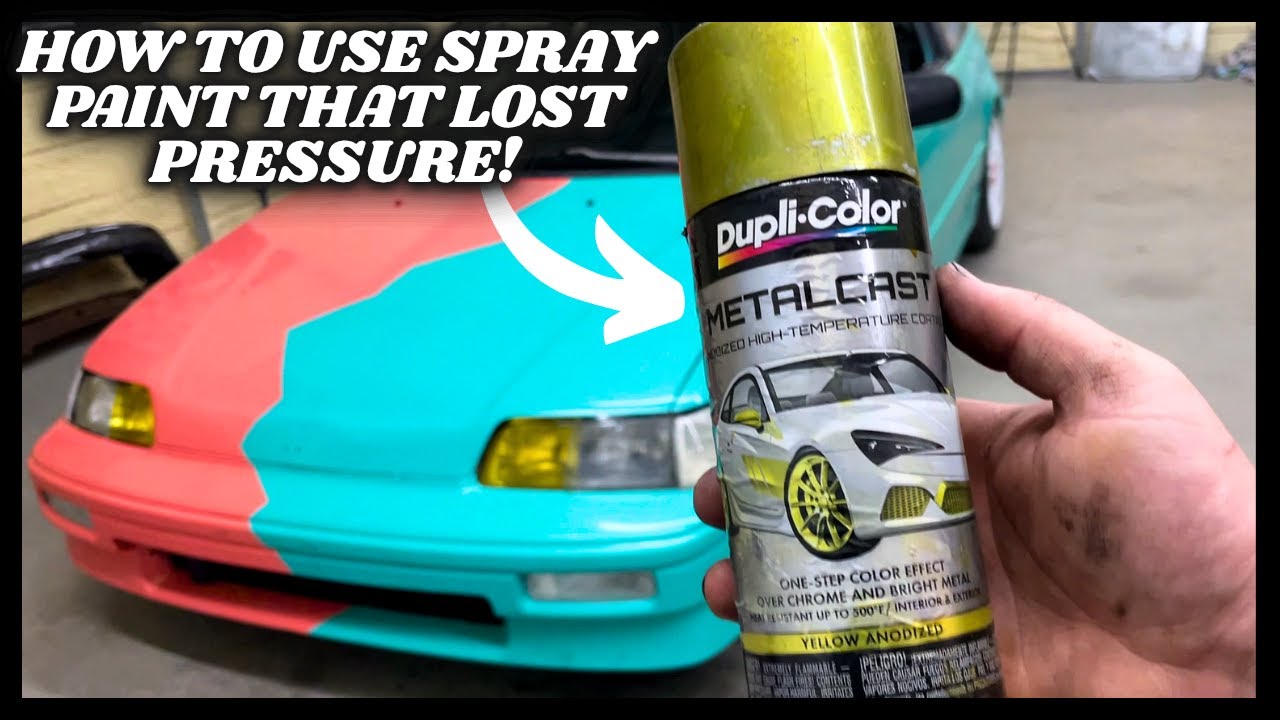
Choosing the right spray paint is key to a smooth, lasting finish on your car hood. The paint must suit the surface, color, and durability needs. Picking the wrong type can cause peeling, fading, or uneven color.
Understanding different spray paints helps you find the best fit for your project. Think about the look you want and how long the paint should last. This guide breaks down types, color tips, and budget choices.
Types Of Spray Paint For Cars
- Acrylic Enamel:Dries hard and glossy. Good for beginners.
- Acrylic Lacquer:Fast-drying with a shiny finish. Needs careful application.
- Urethane:Durable and resistant to chips. Often used in professional jobs.
- Base Coat/Clear Coat:Two-step system. Base coat gives color, clear coat protects.
Color Matching Tips
- Check your car’s paint code, usually inside the door frame.
- Use a color matching app or tool to compare paint samples.
- Test spray on a small area before painting the hood.
- Choose spray paint with UV protection to prevent fading.
Quality Vs. Budget Options
| Aspect | Quality Spray Paint | Budget Spray Paint |
|---|---|---|
| Durability | Lasts longer, resists chips | May fade or chip faster |
| Finish | Smoother, more even coverage | May be uneven or dull |
| Price | Higher cost per can | Lower cost per can |
| Ease of Use | Designed for car surfaces | May require extra coats or prep |
Preparing The Car Hood
Preparing the car hood properly is essential for a smooth and lasting paint job. This stage ensures the paint sticks well and the finish looks professional. Taking time to clean, sand, and protect the surrounding areas improves the overall result. Careful preparation avoids peeling and uneven surfaces later on.
Cleaning And Removing Old Paint
Start by washing the hood with soap and water. Remove all dirt, grease, and grime. Use a degreaser to clean stubborn spots. Old paint must be stripped if it is peeling or damaged. Use a chemical paint remover or a scraper gently. Make sure the surface is dry before moving to the next step.
Sanding Techniques
Sanding creates a rough surface for the new paint to grip. Use 400-grit sandpaper for light sanding. For rough or damaged areas, start with 220-grit sandpaper. Sand evenly in circular motions. Avoid pressing too hard to prevent scratches. Clean the dust off with a tack cloth after sanding.
Masking Surrounding Areas
Protect parts of the car near the hood. Use painter’s tape to cover edges and trims. Apply plastic sheets or newspapers to shield larger areas. Secure the masking materials firmly to avoid paint leaks. Masking helps keep the paint job clean and tidy.
Setting Up Your Workspace
Ensure a clean, well-lit space for painting. Use drop cloths to protect surrounding areas from overspray. Organize tools and materials within easy reach for efficient workflow.
Setting up your workspace is crucial for a successful car hood painting project. A well-organized area ensures safety and improves the painting outcome. By preparing your workspace, you avoid common pitfalls and achieve a smooth finish.
Choosing A Well-ventilated Area
Select a spot with good airflow. Proper ventilation prevents paint fumes from building up. Open garages or outdoor spaces are ideal. Fresh air ensures safer working conditions. Avoid areas with dust or debris. Clean environments lead to better paint adhesion.
Lighting And Temperature Considerations
Ensure bright lighting. Good visibility helps spot imperfections. Natural light is best, but bright lamps work too. Check the temperature before starting. Ideal temperatures range between 60°F and 80°F. Extreme temperatures can affect paint application. Avoid painting in direct sunlight or cold weather.
Gathering Necessary Tools And Materials
Organize your tools before starting. Essential items include spray paint, sandpaper, and masking tape. Have a clean cloth for wiping surfaces. Use drop cloths to protect the ground. Wear safety gear like masks and goggles. Keep everything within reach to save time. A well-prepared workspace makes the task smoother.

Credit: www.youtube.com
Applying Primer
Applying primer is a crucial step when painting your car hood with spray paint. It creates a smooth, even surface that helps the paint stick better and last longer. Skipping or rushing this step can lead to uneven color and peeling paint down the road.
Types Of Primers For Car Hoods
Choosing the right primer depends on your car hood’s material and the paint you'll use. Here are common types:
- Epoxy Primer:Great for metal surfaces, it offers excellent rust protection and strong adhesion.
- Urethane Primer:Known for its durability and smooth finish, ideal for a flawless paint job.
- Etching Primer:Designed for bare metal, it chemically bonds to the surface to prevent rust.
- High-Build Primer:Helps fill in minor scratches and imperfections, creating a smooth base.
Think about your car hood's condition—does it have rust spots or scratches? Choosing a primer that addresses these issues will save you time later.
Proper Primer Application
Before spraying, clean your hood thoroughly to remove dirt, grease, and dust. Use a tack cloth after washing to pick up tiny particles.
Hold the spray can about 6-8 inches from the surface. Apply the primer in light, even coats. Avoid heavy spraying to prevent drips and runs.
Move the spray can steadily across the hood in overlapping passes. This technique ensures full coverage without thick buildup.
Do you notice any rough spots after the first coat? It’s better to add another thin coat than one thick one. Patience here pays off with a smooth finish.
Drying And Sanding Primer
Let the primer dry completely before sanding. Dry times vary, but typically 30 minutes to an hour is enough for spray primers.
Use fine-grit sandpaper (around 400-600 grit) to gently smooth the surface. Sanding removes imperfections and helps the paint adhere better.
Be careful not to sand too hard—you don’t want to remove the primer entirely. Light, even sanding is key.
After sanding, wipe the hood with a tack cloth to clear away dust. How smooth is your surface now? A perfectly primed hood feels almost silky to the touch, ready for paint.
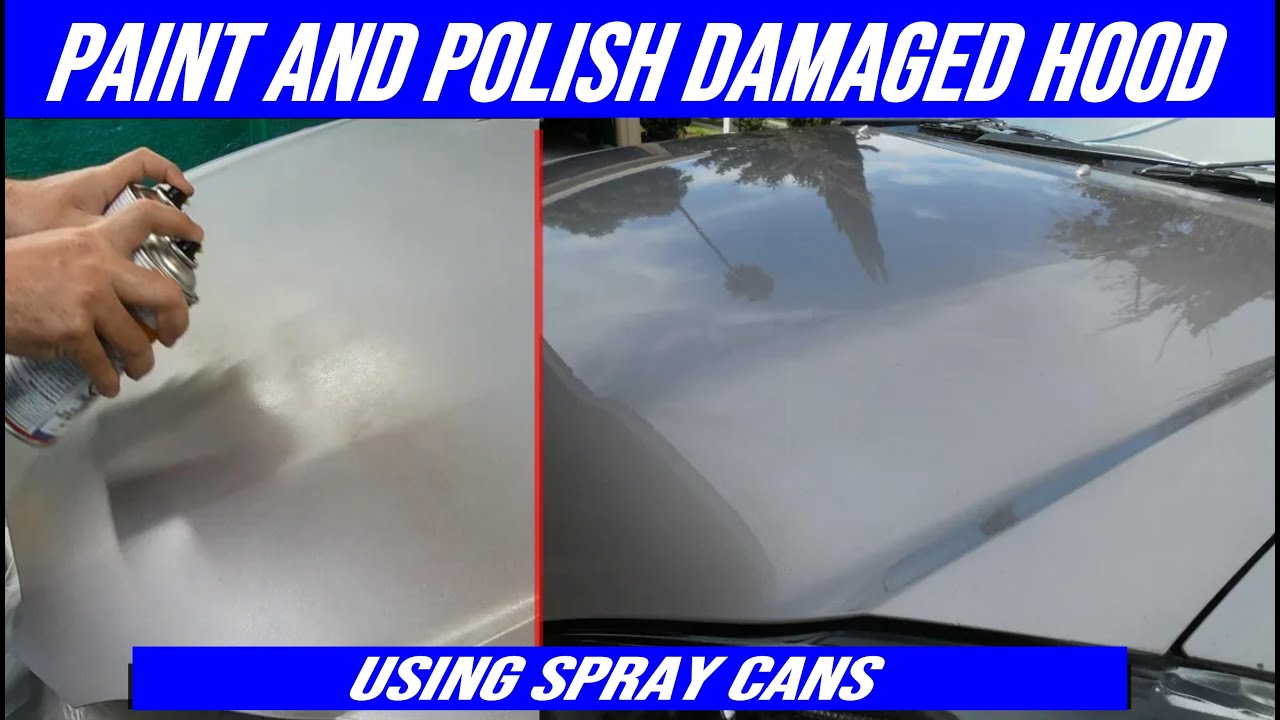
Spray Painting Process
Spray painting a car hood requires careful attention to detail for a smooth finish. The process includes preparing the paint, applying it evenly, and allowing proper drying time. Each stage affects the final look and durability of the paint. Follow these steps to achieve a professional appearance.
Shake And Test The Spray Paint
Shake the spray paint can vigorously for at least one minute. This mixes the paint and prevents clogs. Test the spray on a piece of cardboard or scrap material. Check the spray pattern to ensure it is even and consistent. Adjust your technique if the paint sprays unevenly or in bursts.
Applying Even Coats
Hold the spray can about 6 to 8 inches from the car hood surface. Spray using steady, sweeping motions from side to side. Avoid spraying too much paint in one spot to prevent drips. Apply thin, even coats for the best coverage. Let each coat build color gradually.
Maintaining Spray Distance And Speed
Keep a consistent distance between the spray can and the hood. Move your hand at a steady speed to avoid paint buildup. Too slow causes drips, too fast leads to thin coverage. Practice maintaining the right speed and distance before painting the hood. Smooth, even strokes create a clean finish.
Layering And Drying Times
Allow each coat to dry for 10 to 15 minutes before applying the next. Multiple thin layers create a stronger and smoother finish. Avoid rushing to prevent paint from sagging or cracking. Follow the paint manufacturer’s instructions for drying times. Patience improves the final paint quality.
Adding Clear Coat
Adding a clear coat is a vital step in painting a car hood with spray paint. It protects the paint and gives a smooth, shiny finish. The clear coat helps keep the color bright and guards against scratches and weather damage.
Applying a clear coat requires care and patience. The right technique ensures a strong, even layer that lasts long. This section explains the benefits, how to apply it, and the drying process.
Benefits Of Clear Coating
- Protects paint from UV rays and fading
- Prevents scratches and minor damage
- Enhances paint gloss and depth
- Seals paint, stopping moisture and dirt
- Makes cleaning easier and more effective
Application Techniques
Shake the clear coat spray can well before use. Hold the spray about 6 to 8 inches from the surface. Spray in smooth, even strokes from side to side. Avoid heavy layers to prevent drips and runs.
Apply two to three thin coats, allowing light drying time between each. Keep the spray moving to cover the entire hood evenly. Use a clean, dust-free area to avoid particles sticking to the wet coat.
Drying And Curing Time
Let the clear coat dry for 20 to 30 minutes between coats. After the final coat, wait at least 24 hours before touching the surface. Full curing can take up to a week, depending on temperature and humidity.
During curing, avoid washing or exposure to harsh conditions. The clear coat hardens over time, providing maximum protection and shine.
Finishing Touches
After applying spray paint on your car hood, the finishing touches are crucial to achieve a professional, showroom-quality look. These final steps remove any imperfections and bring out a deep, glossy shine. Pay close attention here—small details make a big difference in how your paint job lasts and looks over time.
Wet Sanding For Smoothness
Wet sanding helps smooth out any bumps, orange peel texture, or dust particles trapped in the paint. Use fine-grit sandpaper, typically 1500 to 2000 grit, soaked in water to gently sand the surface.
Keep the surface wet while sanding to avoid scratching. Lightly sand in circular motions and frequently check your progress by wiping the area clean. If you feel rough patches or see unevenness, don’t rush—patience here pays off.
Polishing And Buffing
Polishing removes the fine scratches left by wet sanding and brings a glossy finish. Use a quality rubbing compound and a soft polishing pad on a buffer or by hand for smaller areas.
Apply polish in small sections, working it in with moderate pressure until you see a shine developing. Buffing enhances depth and clarity, making your car hood look like it just rolled off the assembly line.
Cleaning Up And Inspecting
After polishing, clean the hood thoroughly with a microfiber cloth and a gentle cleaner to remove any residue. Inspect the surface under natural light to spot any missed imperfections or streaks.
Take your time here—do you notice any dull spots or uneven shine? Address them with a light polish or touch-up if needed. A meticulous final inspection ensures your hard work truly pays off.
Credit: www.youtube.com
Common Mistakes To Avoid
Painting a car hood with spray paint can be satisfying but tricky. Avoiding common mistakes helps achieve a smooth, professional look. These errors often lead to frustration and poor results. Knowing what to watch out for saves time and paint.
Paint Runs And Drips
Applying too much paint causes runs and drips on the surface. Thick layers do not dry evenly. Hold the spray can 6 to 8 inches away from the hood. Spray in light, even coats. Let each layer dry before adding another. Moving the can steadily prevents paint buildup.
Uneven Coverage
Uneven paint looks patchy and unprofessional. Spray too fast or too slow causes blotches. Overlapping each pass slightly ensures full coverage. Keep the spray gun at a consistent distance. Multiple thin layers work better than one thick coat. Patience improves the final appearance.
Ignoring Weather Conditions
Spraying outside on a windy or humid day harms the paint job. Dust and debris stick to wet paint easily. High humidity slows drying and causes bubbles. Choose a dry, calm day with moderate temperatures. Indoor spaces with good ventilation are ideal. Proper conditions help paint adhere and cure well.
Maintenance Tips For Longevity
Maintaining the fresh look of your newly spray-painted car hood takes more than just a careful paint job. How you care for the surface afterward directly affects how long the paint lasts and stays vibrant. Let’s look at simple, effective ways to protect your work and keep your car hood looking sharp for years.
Washing And Waxing
Regular washing is key to keeping your paint job clean and free from harmful dirt and grime. Use a gentle car wash soap and a soft sponge or microfiber cloth to avoid scratching the surface.
Waxing adds an extra layer of protection and enhances the shine. Apply a high-quality wax every few months to shield the paint from UV rays and environmental pollutants. Have you noticed how your car’s paint looks richer right after waxing? That’s the kind of glow you want to maintain.
Protecting The Paint From Damage
Think about the last time you parked under a tree—did you find bird droppings or sap on your car hood? These substances can quickly eat away at fresh paint.
Cover your car or use a carport whenever possible to limit exposure to harsh elements like sun, rain, and debris. You might also consider a clear protective film over the paint. This invisible shield takes the brunt of minor scratches and chips, saving your paint underneath.
Touch-up Techniques
Even with the best care, small chips and scratches can happen. Don’t ignore these spots because they can lead to rust and bigger damage.
Keep a small bottle of matching spray paint handy for quick fixes. Clean the area thoroughly, lightly sand the edges of the chip, then carefully apply thin layers until the spot blends with the rest of the hood.
Have you ever left a tiny chip untreated, only to regret it later? Taking a few minutes to fix it early keeps your paint job flawless and avoids costly repairs down the road.
Credit: www.youtube.com
Frequently Asked Questions
How Do I Prepare A Car Hood For Spray Painting?
Clean the hood thoroughly to remove dirt and grease. Sand the surface evenly to create a smooth base. Apply a primer to help the paint stick better and last longer. Let the primer dry completely before painting.
What Type Of Spray Paint Is Best For Car Hoods?
Use automotive spray paint specifically designed for cars. Choose paint that offers durability and weather resistance. Opt for a paint brand with good reviews to ensure quality. Always pick the right color match for your vehicle.
How Many Coats Of Spray Paint Should I Apply?
Apply 2 to 3 thin coats of spray paint. Let each coat dry for about 10 to 15 minutes before applying the next. Thin coats prevent drips and ensure an even finish. Multiple coats create a rich, durable color.
Can I Paint A Car Hood Without Sanding?
Sanding is recommended for the best results but not mandatory. If the surface is smooth and clean, you might skip sanding. However, skipping sanding can reduce paint adhesion and durability. Sanding ensures a professional, long-lasting finish.
Conclusion
Painting a car hood with spray paint takes patience and care. Prepare the surface well to get smooth results. Apply thin, even coats to avoid drips and runs. Allow each layer to dry before adding the next. Take your time and work in a clean, dry area.
Small mistakes can be fixed with light sanding and touch-ups. Enjoy the satisfaction of a fresh, new look on your car hood. Simple steps lead to great results. Your effort will shine through in the final finish.