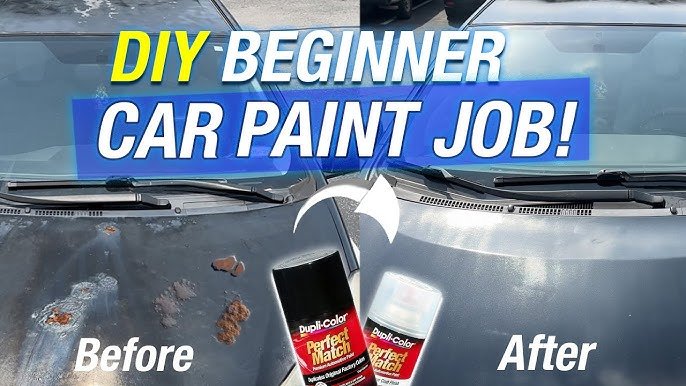
Are you ready to give your car a fresh, eye-catching look without spending a fortune? Painting your car hood with a spray can is easier than you might think.
With the right steps, you can achieve a smooth, professional finish right at home. This guide will show you exactly how to prepare, paint, and protect your car hood so it stands out on the road. Keep reading, and you’ll discover tips that save you time, money, and frustration—transforming your car hood into a shining masterpiece.

Credit: www.youtube.com
Preparing The Car Hood
Preparing your car hood properly is the key to a flawless spray paint job. Skipping or rushing this step often leads to uneven paint, peeling, or bubbles down the road. Taking time to prepare ensures your new paint sticks well and looks professional.
Cleaning And Degreasing
Start by washing the hood thoroughly with soap and water to remove dirt and dust. Next, use a degreaser or rubbing alcohol on a clean cloth to wipe down the surface. This step removes oils and residues that can prevent paint from adhering properly.
Have you ever painted over a dusty or greasy surface and ended up with rough spots? Cleaning well avoids that frustration and saves you from repainting later.
Sanding For Smoothness
Use 400 to 600 grit sandpaper to sand the entire hood surface evenly. This roughens up the old paint and creates a good base for the spray paint to grip onto. Sand in a circular motion, applying gentle pressure to avoid damaging the metal underneath.
If you notice any rust or peeling paint spots, sand them down more thoroughly. Taking the extra time here will help your new paint stay intact and look smooth.
Masking Surrounding Areas
Protect your windshield, headlights, and nearby body panels by covering them with painter’s tape and plastic sheets. Masking prevents accidental overspray that’s tough to remove. It also lets you focus on the hood without worrying about damaging other parts.
Have you ever had to fix paint on unintended spots? Careful masking saves you from that headache and keeps your project clean and professional.
Credit: www.youtube.com
Choosing The Right Spray Paint
Choosing the right spray paint is crucial for getting a smooth, durable finish on your car hood. The paint you select affects not only the look but also the longevity of the job. Understanding different types of spray paints, how to match colors, and gathering the right supplies can save you time and frustration.
Types Of Spray Paints
There are several spray paint options designed specifically for automotive use. Acrylic enamel offers a hard, glossy finish that resists chipping well. Acrylic lacquer dries quickly and is easy to polish but may require more coats for durability.
Urethane-based spray paints provide excellent durability and chemical resistance, making them ideal for car hoods exposed to weather and road debris. Keep in mind that urethane paints often need a separate activator to cure properly.
- Acrylic Enamel:Hard finish, good durability
- Acrylic Lacquer:Quick drying, easy to buff
- Urethane-Based:Very durable, requires activator
Color Matching Tips
Matching the color perfectly can be tricky. Start by finding the paint code on your vehicle, usually located inside the driver’s door or under the hood. This code ensures you pick the exact factory color.
If you don’t have access to the code, bring a small piece of your hood or a chip of the paint to an automotive paint store for a match. Test the spray paint on a small, hidden area first to see how it looks when dry.
Remember, lighting can affect how colors appear. Check your test spot in daylight and artificial light before committing.
Gathering Necessary Supplies
Along with the right spray paint, you’ll need specific tools for a professional finish. Grab a few cans of primer to prepare the surface properly. Sandpaper in various grits helps smooth out imperfections before painting.
Don’t forget protective gear like gloves and a mask to keep yourself safe from fumes. A tack cloth is also handy to remove dust right before painting.
- Primer spray cans
- Sandpaper (320 to 600 grit)
- Protective gloves and mask
- Tack cloth
- Clear coat spray for a glossy finish
Setting Up Your Workspace
Choose a clean, well-ventilated area to work safely. Cover nearby objects to avoid paint overspray and keep tools within reach.
Setting up your workspace is a crucial step in achieving a professional finish when painting your car hood with a spray can. A well-prepared workspace ensures not only a smoother painting process but also your safety and the protection of your surroundings. Whether you're painting in your garage or outdoors, getting your space ready can make all the difference.
Choosing A Well-ventilated Area
When painting, you'll want to choose a space that allows for plenty of fresh air. This helps to disperse fumes and speeds up drying time. If you're indoors, open windows and doors or use fans to create airflow. Outdoor spaces are ideal, but ensure they're sheltered from wind and direct sunlight to avoid dust or debris settling on the wet paint. Have you thought about how airflow affects not just drying, but also your health during the painting process?
Protecting Surfaces And Yourself
Before you start painting, cover any nearby surfaces with drop cloths or plastic sheets. This prevents unwanted paint splatter on your driveway or garage floor. Wear protective gear like masks, gloves, and goggles to protect yourself from fumes and accidental splashes. It's better to be over-prepared than to clean up a mess later. Have you ever had to scrub paint off a surface it wasn't meant to be on?
Optimal Temperature And Humidity
Paint behaves differently depending on the temperature and humidity. Aim for a temperature range of 60-80°F (15-27°C) for the best results. High humidity can cause the paint to dry too slowly, while low humidity can make it dry too quickly, leading to cracks. A simple thermometer and hygrometer can help you monitor these conditions. How often do you check the weather before starting a DIY project? Preparing your workspace might seem tedious, but it's an investment in the quality of your work. Taking these steps ensures you’re set up for success and a sleek, professional finish on your car hood.
Applying Primer
Applying primer is a key step in painting your car hood. It creates a smooth base for the paint and helps it stick better. Primer also protects the metal from rust and damage. Taking time to apply primer correctly improves the final look and durability of the paint job.
Selecting The Primer
Choose a primer made for automotive use. It should match the material of your hood, such as metal or plastic. Look for primers labeled as rust-inhibiting if your hood is metal. A spray primer is best for an even coat. Read the label to ensure compatibility with your topcoat paint.
Spray Techniques For Even Coverage
Hold the spray can about 6 to 8 inches from the surface. Use smooth, side-to-side motions to cover the hood. Avoid spraying too close to prevent drips and runs. Apply several light coats instead of one heavy coat. Let each coat dry for a few minutes before applying the next.
Drying And Sanding The Primer
Allow the primer to dry fully; check the instructions on the can. Dry time usually ranges from 20 to 60 minutes. Once dry, gently sand the surface with fine-grit sandpaper. Sanding smooths out imperfections and prepares the surface for paint. Wipe away dust with a clean, dry cloth before painting.
Spraying The Base Coat
Spraying the base coat is a crucial part of painting your car hood. This layer sets the tone for the final color and ensures smooth coverage. Careful application helps prevent runs, drips, and uneven spots.
Proper technique during this stage improves adhesion and durability. Focus on steady, even spraying to create a flawless surface.
Shaking And Testing The Can
Shake the spray can for at least one minute. This mixes the paint inside and ensures even color. Test the spray on a piece of cardboard or scrap metal. Check the spray pattern. It should be smooth and consistent without sputtering.
Maintaining Proper Distance
Hold the can about 6 to 8 inches from the hood. This distance helps the paint lay down evenly. Too close causes drips. Too far leads to thin, patchy coverage. Move the can in steady, side-to-side strokes.
Multiple Thin Coats Strategy
Apply several thin coats instead of one thick coat. Thin layers dry faster and reduce runs. Each coat builds color gradually. Keep the spray moving to avoid heavy spots. Light layers create a smooth, even base.
Drying Time Between Coats
Wait about 10 to 15 minutes between coats. This lets the paint dry enough to avoid lifting the previous layer. Check the paint’s instructions for exact drying times. Proper drying improves adhesion and finish quality.

Credit: www.youtube.com
Adding Clear Coat
Adding a clear coat is a crucial step in painting your car hood with a spray can. This final layer protects your paint job and brings out a professional shine. Skipping or rushing this step can leave your work vulnerable to damage and dullness.
Purpose Of Clear Coat
The clear coat acts as a shield against scratches, UV rays, and weather elements. It helps preserve the color underneath and prevents fading over time. Think of it as a protective armor that keeps your paint looking fresh and vibrant.
Application Tips
- Shake the can well for at least two minutes to ensure even distribution.
- Hold the spray can about 6-8 inches away from the surface to avoid drips.
- Apply several light coats instead of one heavy coat; this prevents runs and bubbles.
- Allow each layer to dry for about 10-15 minutes before adding the next.
- Work in a dust-free, ventilated area to avoid particles sticking to the wet paint.
Ensuring A Glossy Finish
After applying the clear coat, let it cure fully—this can take up to 24 hours depending on conditions. You can gently wet sand with very fine grit sandpaper (1500-2000 grit) to smooth out any imperfections. Finish by polishing with a rubbing compound to bring out a deep, glossy shine.
Have you ever noticed how a clear coat can turn a flat paint job into something that catches the eye? That difference is what makes this step worth your time and patience.
Post-painting Care
After painting your car hood with a spray can, taking proper care ensures a smooth and lasting finish. Post-painting care protects the new layer and keeps the surface looking fresh. Follow these simple steps to maintain your paint job.
Removing Masking Tape
Peel off the masking tape carefully once the paint is dry to touch. Pull the tape slowly at a 45-degree angle. Avoid tearing the paint or leaving residue on the surface. Removing tape too early can ruin the edges of your paint. Wait at least 30 minutes after painting to start removing tape.
Curing Time
Let the paint cure fully before exposing it to harsh conditions. Curing can take up to 24 to 48 hours depending on temperature and humidity. Avoid washing or touching the hood during this time. Keep the car in a dry, dust-free place. Proper curing improves paint durability and shine.
Polishing And Waxing
Once the paint cures, polish the surface gently to remove minor imperfections. Use a fine polish and a soft cloth for best results. After polishing, apply a coat of wax to protect the paint from UV rays and dirt. Waxing adds shine and extends the life of your paint job. Repeat waxing every few months for lasting protection.
Troubleshooting Common Issues
Painting a car hood with a spray can can be rewarding, but it’s easy to run into some common problems. Knowing how to troubleshoot these issues will save you time and frustration. Let’s look at how to fix drips, uneven coverage, and dust contamination to get a smooth, professional finish.
Dealing With Drips And Runs
Drips happen when too much paint lands in one spot. This can create thick, uneven areas that take longer to dry and look messy.
If you notice drips, don’t panic. Let the paint dry completely before sanding the drips lightly with fine-grit sandpaper. After smoothing the surface, apply thin, even coats to avoid repeats.
Spraying too close or holding the can in one place too long often causes runs. Keep the can moving steadily about 6-8 inches from the surface. Have you tried practicing on cardboard to get a feel for the spray pattern before tackling your hood?
Fixing Uneven Coverage
Uneven coverage shows as patchy or thin areas on your hood. It usually means the paint wasn’t applied evenly or the spray can wasn’t shaken enough.
Shake the can vigorously for at least a minute before starting. Apply multiple thin layers rather than one thick one, letting each coat dry as recommended.
If some spots look lighter after drying, gently sand the edges and respray those areas. Would you agree that patience often leads to a better finish than rushing to cover everything at once?
Handling Dust And Debris
Dust and debris can ruin a smooth paint job by sticking to the wet surface. You might see tiny bumps or particles embedded in the paint.
To minimize contamination, paint in a clean, wind-free area. Wiping the hood with a tack cloth before spraying helps remove dust.
If debris gets trapped, wait for the paint to dry, then carefully sand the area and repaint. Have you noticed how much cleaner your workspace feels when you take these small extra steps?
Frequently Asked Questions
How Do I Prepare A Car Hood Before Spray Painting?
Clean the hood thoroughly to remove dirt and grease. Sand the surface evenly to promote paint adhesion. Mask off areas not to be painted. Use a primer suitable for metal to ensure better paint coverage and durability.
What Type Of Spray Paint Is Best For Car Hoods?
Use automotive-grade spray paint designed for metal surfaces. Choose paint with UV protection to prevent fading. Select the correct color code matching your car’s original paint. Always use a clear coat to protect and enhance the finish.
How Many Coats Of Spray Paint Should I Apply?
Apply 2 to 3 thin coats for an even finish. Allow each coat to dry for 10-15 minutes before applying the next. Avoid thick layers to prevent runs and drips. Finish with a clear coat for added protection.
How Long Does Spray Paint Take To Dry On A Car Hood?
Spray paint typically dries to the touch within 20-30 minutes. Full curing can take 24-48 hours depending on temperature and humidity. Avoid touching or exposing the hood to moisture during this time for best results.
Conclusion
Painting a car hood with a spray can is simple and rewarding. Take time to prepare the surface well. Spray in thin, even layers to avoid drips. Let each coat dry before applying the next. Work in a clean, dust-free space for best results.
Patience and care will give your hood a fresh, smooth finish. Try these steps, and enjoy your renewed car look.