

Your car’s bumper is one of the first things people notice, and scratches can make it look old and worn out. But you don’t have to rush to the repair shop or spend a fortune to fix those marks.
What if you could restore your plastic bumper to its original look with simple steps you can do yourself? You’ll discover easy and effective ways to repair scratches on your plastic car bumper. Keep reading, and by the end, you’ll know exactly how to bring back that smooth, flawless finish your car deserves.
Assessing The Damage
Before repairing scratches on a plastic car bumper, check the damage carefully. This step helps choose the best repair method and tools. Some scratches are easy to fix, while others need more work. Knowing the type and depth of the scratch saves time and effort.
Types Of Scratches
Scratches on plastic bumpers vary in appearance and damage. Common types include:
- Surface scratches:Light marks that only affect the clear coat or paint layer.
- Scuff marks:Caused by rubbing against another surface, leaving discoloration but no deep cut.
- Deep scratches:Cuts that reach the plastic base, often leaving rough edges.
- Cracks:Breaks in the bumper material, which may need replacement or special filler.
Identifying the type helps decide whether to polish, fill, or replace parts.
Depth And Severity
Depth matters more than length. Shallow scratches are easier to fix. You can often polish them out or use touch-up paint. Deep scratches expose the plastic and might require sanding and filling.
Check severity by running your fingernail over the scratch. If it catches, the scratch is deep. Evaluate the damage under good light for a clear view. This step ensures the repair looks smooth and lasts longer.
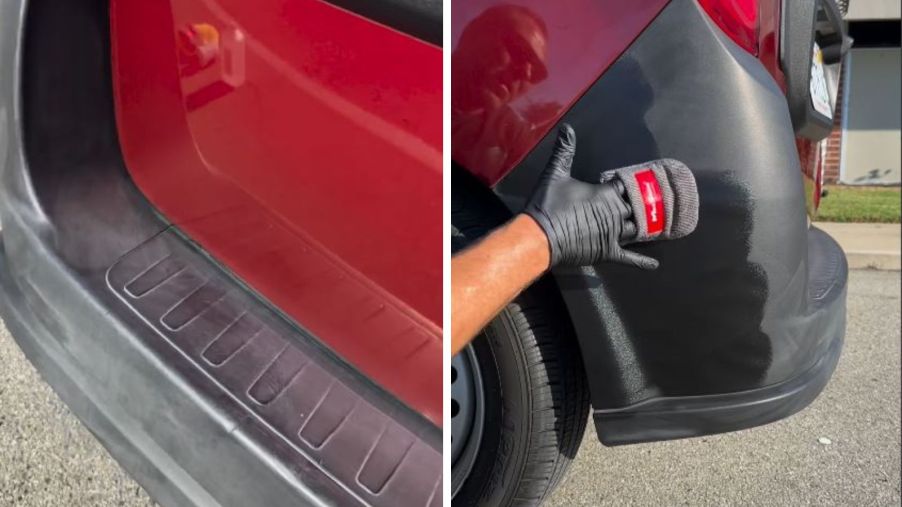
Credit: www.motorbiscuit.com
Gathering Repair Materials
Before you start fixing scratches on your plastic car bumper, gathering the right materials is key. Having everything ready saves time and avoids frustration during the repair. Knowing exactly what tools and products to use makes the process smoother and more effective.
Essential Tools
Start with a clean workspace and the right tools at your fingertips. You’ll need:
- Sandpaper(various grits, typically 400, 800, and 1500)
- Microfiber clothsfor cleaning and drying
- Plastic spreaderto apply filler or putty evenly
- Masking tapeto protect surrounding areas
- Spray primerdesigned for plastic surfaces
- Spray paintmatching your car’s color
Have you ever tried fixing a scratch without sandpaper? It’s frustrating and often leaves rough edges that show through the paint. Sandpaper smooths the area and prepares it for the next steps.
Recommended Products
Choosing the right products can make a huge difference in your repair’s final look. Here are some reliable options:
| Product | Purpose | Why It’s Recommended |
|---|---|---|
| 3M Plastic Bumper Repair Kit | Filler and repair compound | Easy to use and adheres well to plastic |
| Dupli-Color Bumper & Trim Paint | Color matching spray paint | Durable finish that resists chips and fading |
| Meguiar’s PlastX Clear Plastic Cleaner & Polish | Cleaning and polishing | Restores shine without damaging plastic |
Have you noticed how some paint chips off after a few weeks? Using products specifically made for plastic bumpers helps avoid that problem. Picking the right items upfront saves you from redoing the work later.
Preparing The Bumper Surface
Clean the bumper thoroughly to remove dirt and grease. Sand the scratched area gently to smooth the surface. This helps the repair material stick better.
Preparing the surface of your car’s plastic bumper is a crucial step in repairing scratches effectively. A well-prepared surface ensures that any subsequent repair work adheres properly, resulting in a seamless finish. Let’s dive into some practical tips to get your bumper ready for repair.Cleaning Techniques
First, thoroughly clean the bumper to remove any dirt, grime, and road residue. Use a mild car detergent mixed with warm water. A soft sponge or cloth works best to avoid adding more scratches. Rinse the bumper well and allow it to dry completely. You might be surprised at how much difference a clean surface can make. Any leftover debris can interfere with the repair process, so take your time with this step.Sanding Tips
Once clean, assess the depth of the scratches. For shallow scratches, a fine-grit sandpaper (around 600 grit) is ideal. Sand the scratched area lightly and evenly, following the direction of the scratch. This prepares the surface for filling and painting. For deeper scratches, start with a coarser grit (around 320 grit) before moving to finer sandpaper to smooth the area. Always keep the sandpaper slightly wet to minimize dust and achieve a smoother finish. Have you ever noticed how a smooth surface feels? That’s the level of preparation you want before moving forward with repairs.Fixing Minor Scratches
Minor scratches on a plastic car bumper can spoil your car’s look. These small marks are easy to fix at home. Taking quick action stops damage from getting worse. Use simple tools and products for a smooth repair. This section guides you through effective ways to handle minor scratches.
Using Scratch Removers
Scratch removers are special products designed for plastic surfaces. They work by filling in or smoothing out the scratch. Follow these tips for best results:
- Clean the bumper with soap and water before applying.
- Apply a small amount of scratch remover to a soft cloth.
- Rub gently over the scratch in a circular motion.
- Repeat until the scratch fades or disappears.
- Wipe off any excess product with a clean cloth.
Choose a remover made for plastic car parts. These products are safe and effective for light scratches.
Polishing Methods
Polishing helps restore the shine and smoothness of your bumper. It removes tiny surface scratches and dullness. Use a polishing compound with a soft cloth or a polishing pad. Here’s how:
- Clean the bumper to remove dirt and dust.
- Apply a small amount of polish to the cloth or pad.
- Rub the polish over the scratched area using light pressure.
- Work in small sections with circular motions.
- Buff the area with a clean microfiber cloth to shine.
Polishing not only hides scratches but also protects the plastic surface. Repeat polishing occasionally to maintain a fresh look.
Repairing Deeper Scratches
Deeper scratches on your plastic car bumper can feel intimidating to fix. Unlike light surface scratches, these gouges require a bit more effort to restore the smooth look of your bumper. But with the right materials and technique, you can bring back that clean finish without needing to replace the entire part.
Applying Plastic Filler
Start by cleaning the scratched area thoroughly with soap and water, then dry it completely. Next, use a plastic filler specifically designed for automotive bumpers. These fillers come as two-part compounds that harden quickly after mixing.
Apply the filler carefully with a putty knife, pressing it into the scratch to fill all gaps. Don’t worry if it looks uneven at first; you’ll smooth it out later. Make sure to cover the entire damaged area and extend slightly beyond the scratch’s edges for a seamless repair.
Smoothing And Sanding
Once the filler has dried, it’s time to smooth the surface. Begin sanding with medium-grit sandpaper (around 180 grit) to level the filler with the bumper’s surface. Keep the sandpaper wet during this process to avoid dust and achieve a cleaner finish.
After the initial sanding, switch to finer grit sandpaper (320 to 400 grit) to blend the edges and create a smooth transition. This step is crucial because it prevents the repaired area from standing out once painted. Have you noticed how a rough patch ruins the look even after repainting? That’s why patience in sanding pays off.
Credit: www.subaruxvforum.com
Painting And Finishing
Painting and finishing are the final steps in repairing scratches on a plastic car bumper. These steps restore the bumper’s color and provide protection. Proper painting helps blend the repair with the rest of the car. Finishing adds shine and guards against future damage.
Choosing The Right Paint
Select paint that matches your car’s color code. Use automotive spray paint for even coverage. Consider paint designed for plastic surfaces. Check the paint type: acrylic or enamel are common choices. Using the correct paint ensures a smooth and lasting finish.
Applying Primer And Paint
Start with a plastic primer to help the paint stick better. Spray a thin, even layer of primer over the repaired area. Let it dry completely before painting. Apply paint in light, multiple coats to avoid drips. Allow each coat to dry before applying the next one.
Sealing With Clear Coat
Clear coat protects the paint from scratches and fading. Spray a clear coat evenly over the painted area. Use several thin layers instead of one thick layer. Let each layer dry well to build a strong finish. The clear coat gives a glossy look and extra durability.
Preventing Future Damage
Preventing future damage to your plastic car bumper helps keep your vehicle looking fresh. Scratches and scuffs can be avoided with simple care and protection. Taking a few steps today saves time and money tomorrow.
Protective Coatings
Applying a protective coating shields the bumper from minor scratches and dirt. Use a clear paint protection film or a ceramic coating designed for plastic surfaces. These coatings create a barrier that absorbs small impacts and resists UV damage.
Regular application of wax also adds a layer of defense. It helps repel water and reduces friction from dust or debris. Protective coatings keep the bumper’s finish smooth and shiny longer.
Maintenance Tips
- Wash the bumper gently with mild soap and water to avoid scratches.
- Use a soft cloth or sponge during cleaning instead of rough brushes.
- Avoid parking too close to other vehicles or objects that may cause damage.
- Inspect the bumper regularly for small chips and touch them up quickly.
- Keep the bumper dry to prevent dirt buildup and fading.
Routine care prevents small issues from turning into bigger problems. Protect your bumper by treating it well every day.
Credit: www.kiasoulforums.com
Frequently Asked Questions
How Do I Fix Scratches On A Plastic Car Bumper?
To fix scratches, clean the area first. Sand lightly, apply plastic filler if deep, then sand smooth. Paint with matching color and finish with clear coat for protection and shine.
What Materials Are Needed To Repair Bumper Scratches?
You need sandpaper, plastic filler, primer, matching paint, clear coat, and cleaning supplies. These materials help smooth, fill, and protect the repaired area effectively.
Can I Repair Bumper Scratches Without Professional Help?
Yes, small to moderate scratches can be repaired at home. Follow proper steps carefully and use quality materials for best results. Larger damage may require professional assistance.
How Long Does It Take To Repair Bumper Scratches?
Repair time varies by scratch severity but usually takes 1-3 hours. This includes cleaning, sanding, filling, painting, and drying time for each layer.
Conclusion
Fixing scratches on a plastic car bumper is simple and cost-effective. Clean the area well, use the right products, and follow each step carefully. Small scratches can disappear with basic tools and patience. Regular care helps keep your bumper looking new longer.
Try these easy methods to save money and improve your car’s look. Taking action quickly prevents damage from getting worse. Your car deserves a smooth, clean bumper without the hassle. Give it a try and see the difference yourself.